|
|
|

How to Draw a Shark
Smart Art Institute Online - Drawing and Painting Art Lessons
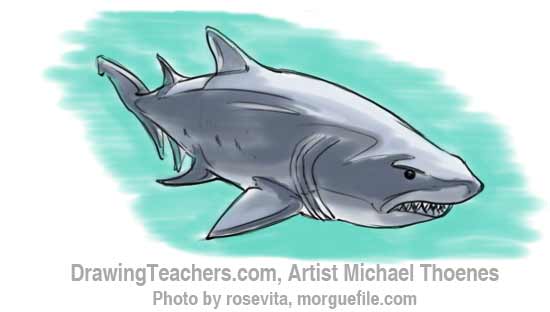
A shark is an awesome fish to draw. This art lesson uses a photo of a shark as reference and shows how to draw and paint it.
ADVERTISEMENT
Now let's get started with the shark drawing
step by step drawing tutorial.
Shark Drawing Tutorial Part 1:
Begin with a reference image of the shark you plan to draw.

Shark Drawing Tutorial Part 2:
Study the reference image and if possible, print it and draw some lines onto your reference image as you study it. If you can't draw directly on your reference image, you could use tracing paper, acetate, or print a copy of it to draw on.
Draw a line from the shark's nose to its tail. Draw another from top fin to bottom fin.
Also draw a horizontal line as guide for the angle of the line that goes from nose to tail. This will help when making the guide lines on your paper.
Next, draw the same lines as a guide on your paper. It is easiest to make it the same size as the reference image but you can make your drawing larger or smaller.

Shark Drawing Tutorial Part 3:
Continue your drawing by adding curves for the shark's back and belly. Sketch in the shape of the tail.

Shark Drawing Tutorial Part 4:
Sketch in the fins and gills. Throughout the drawing process, refine your sketch based on your careful observations of the shark photo. Make refinements to the tail and to the nose.

Shark Drawing Tutorial Part 5:
Continue to refine your image and detail it by adding the eye and shaping the face. Lightly mark the edges of the areas of the major shading in the of the sharks body.

Shark Drawing Tutorial Part 6:
Give your shark drawing some sharp teeth.

Shark Drawing Tutorial Part 7:
Time to ink your sketch with pen or dark pencil lines, colored pencil, etc.

Shark Drawing Tutorial Part 8:
Continue to ink your drawing by completing the back half of the shark's body.

Shark Drawing Tutorial Part 9:
Erase your sketching to leave the outlines.

Shark Drawing Tutorial Part 10:
Painting or coloring your shark: Begin with a light gray base color. The process of painting or shading your shark drawing involves building up layers of shading. In the following steps you may need to switch between lighter and darker shading as you refine your drawing.

Shark Drawing Tutorial Part 11:
Shade in the shadowed areas.

Shark Drawing Tutorial Part 12:
Darken the shadowed area with a medium gray.

Shark Drawing Tutorial Part 13:
Work back in with a lighter gray shading to smooth the shark.

Shark Drawing Tutorial Part 14:
Darken the areas on the fins and side.

Shark Drawing Tutorial Part 15:
Color or shade in the water around your shark if you desire.

Shark Drawing Tutorial Part 16:
Refine your drawing by lightly drawing in some of the detail lost in the painting/shading process.

Shark Drawing Tutorial Part 17:
The finished shark drawing.
Congratulations you have finished this online art lesson,
"How to Draw a Shark!"
Great Job!
Smart Links
Another online tutorial for drawing a shark
Learn more about Sharks at Wikipedia
Shark pictures at national geographic
Return from How to Draw a Shark to Home
Recommended Additional Learning:
Want to learn more on this topic? We’ve got you covered. Check out these resources:
- How To Draw Animals For Beginners - Get AMAZING Results
- How to Draw and Sketch for Absolute Beginners
- How to Draw Cute Cartoon Animals with Simple Shapes
(Please note that Drawingteachers.com receives affiliate payment for this referral.)
ADVERTISEMENT
SITE NAVIGATION
New Lessons & Articles
-
Untitled Document
Oct 02, 17 05:24 PM
-
How to Draw Tears of Joy Emoji
Sep 29, 16 08:50 PM
How to Draw a Tears of Joy Emoji Step by Step; Great Drawing Lesson for Kids -
How to Draw Emojis
Sep 29, 16 08:35 PM
How to Draw Emojis for Kids - Easy Art lessons for beginners! Drawing Teachers' Emoji drawing videos teach you step by step.


New! Comments
Have your say about our drawing lessons! Leave us a comment in the box below.